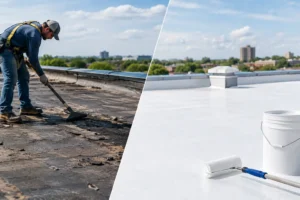
A roof leak near a chimney, vent pipe, skylight, or wall is often blamed on shingles. In many cases, the real issue is the metal flashing that directs water away from those vulnerable transitions. Knowing how to seal roof flashing can help with a small, localized repair, but the wrong sealant or application method can trap water, damage roofing materials, and turn a minor leak into a larger repair.
Roof flashing is not meant to rely on caulk alone. It works as part of a layered water-shedding system. Sealant has an important job at certain joints, edges, and fasteners, but it cannot replace missing, rusted, improperly lapped, or poorly installed flashing.
Start by Finding the Actual Source of the Leak
Water rarely enters a roof directly above the stain you see inside. It can travel along roof decking, rafters, chimney framing, or insulation before becoming visible on a ceiling. Before sealing anything, inspect the flashing area from the exterior on a dry day and look for open seams, lifted edges, cracked sealant, loose fasteners, corrosion, and gaps where flashing meets masonry or siding.
Pay close attention to flashing around chimneys. Chimney flashing includes several pieces that work together: step flashing woven between shingles, base flashing at the roof-to-chimney transition, and counterflashing installed into masonry joints or over the base flashing. If the counterflashing is loose or the mortar joint has failed, adding a bead of roof cement along the surface may only hide the problem temporarily.
Check the roof area above the suspected leak as well. A broken shingle, damaged pipe boot, backed-up gutter, or ice-related roof damage can send water toward otherwise sound flashing. If you cannot safely identify the source, a professional inspection is the smart first move.
Choose a Sealant That Matches the Roof Material
The best product depends on the flashing material, roof type, weather conditions, and location of the repair. A sealant that works well for one detail may fail quickly in another.
For most small exterior flashing repairs, a high-quality polyurethane or tripolymer roofing sealant is a dependable choice. These products remain flexible as temperatures change and typically adhere well to metal, masonry, asphalt shingles, and many roofing membranes. But always check the label for material compatibility before applying it.
Silicone sealant can perform well on certain metal and low-slope roofing applications, especially where long-term UV exposure and standing water are concerns. It is not automatically the right choice for every roof. Some silicone products do not bond well to dirty surfaces or may complicate future coating and repair work.
Avoid using ordinary interior caulk, general-purpose latex caulk, or rigid filler around roof flashing. These products are not made for constant sun exposure, rain, snow, and roof movement. They can crack, shrink, or lose adhesion quickly.
Roofing cement can be useful for a limited emergency patch, such as securing a small lifted shingle edge during active bad weather. It should not be the default solution for every flashing leak. Thick roofing cement smears can hold debris, hide corrosion, and make a proper repair harder later.
How to Seal Roof Flashing Step by Step
A good repair starts with a clean, dry, stable surface. Do not apply sealant in rain, on frost-covered materials, or over a wet roof. Even products labeled for damp surfaces have limits, and dry conditions give the repair its best chance to bond correctly.
1. Work Safely Before You Start
Roof work carries real fall risks. Use a secure ladder on stable ground, wear slip-resistant footwear, and avoid steep, wet, icy, or wind-exposed roof areas. Never step on brittle shingles, skylights, or unsupported roof sections.
If the repair is near a tall chimney, on a two-story home, or on a steep roof, hiring a qualified roofer is safer than attempting the work yourself. A sealant repair is never worth an injury.
2. Remove Failed Sealant and Loose Material
Use a putty knife or scraper to carefully remove cracked, peeling, or separated sealant. Do not force the tool under shingles or bend flashing that is still properly integrated with the roof.
Brush away dirt, leaves, roofing granules, moss, and loose rust. If the flashing has surface oxidation, lightly clean it according to the sealant manufacturer’s preparation instructions. The sealant needs a solid surface to grip, not a layer of dirt or old caulk.
3. Check That the Flashing Is Still Sound
Press gently along the flashing edges. If the metal is loose, bent, deeply rusted, punctured, or separating from the roof or chimney, sealing the edge alone will not solve the problem. Loose flashing often needs to be resecured or replaced.
Look for missing nails or screws, but use care when adding fasteners. Every fastener creates a potential water entry point. On many roofing details, fasteners must be placed in specific locations and covered correctly. Improperly driven fasteners can create more leaks than they fix.
4. Apply a Controlled Bead of Sealant
Cut the sealant tube nozzle at a slight angle and start with a small opening. Apply a steady, continuous bead over the cleaned gap or seam. The goal is full coverage without excessive buildup.
Tool the bead lightly with a gloved finger or a small plastic tool if the product instructions allow it. This presses sealant into the joint and creates a smooth surface that sheds water. Avoid wide, heavy blobs. They may look substantial, but thick sealant can split as the roof expands and contracts.
For a small exposed fastener that is correctly placed but no longer sealed, cover the fastener head with a modest amount of compatible roofing sealant. Do not cover drainage channels, weep holes, or the lower edge of flashing designed to shed water.
5. Let the Repair Cure and Recheck It
Sealants need time to skin over and cure. Keep the area dry for the period listed on the product label. After the next rain, inspect the area from the ground and check the attic or ceiling below for any continuing moisture.
If the leak returns, do not keep adding more sealant. Repeated patching usually indicates a flashing installation issue, a damaged roofing component, or water entering from another location.
Chimney Flashing Needs Extra Attention
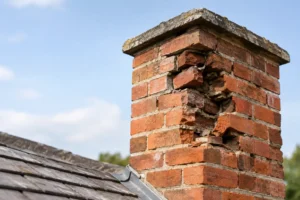
Chimney flashing is one of the most common leak points on New Jersey homes because it joins two very different materials: a moving roof system and a heavy masonry structure. Seasonal temperature swings cause both materials to expand and contract at different rates. Mortar joints can crack, metal can corrode, and roofing materials can wear around the chimney base.
A correctly built chimney flashing system uses layered metal pieces to move water down and away from the chimney. Counterflashing should be properly anchored into the masonry, not simply face-caulked to brick. Sealant is used to protect specific joints, but it should not be asked to carry the entire waterproofing job.
If you see staining on the chimney face, cracked mortar near the flashing line, loose counterflashing, or a soft spot in the roof decking nearby, schedule a professional evaluation. Those signs can point to water intrusion that extends beyond a simple exterior seam.
When Sealing Is Not the Right Repair
Sealing works best for minor cracks in an otherwise sound flashing system. It is not a reliable long-term answer when the flashing is rusted through, missing, incorrectly installed, or damaged by storms, tree branches, or shifting masonry.
Replacement may be needed when step flashing is exposed between shingles, when a chimney has no proper counterflashing, when metal edges are lifting across a large area, or when water has damaged the roof deck beneath the flashing. The repair may also require shingle removal and replacement so the flashing can be integrated correctly.
Flat and low-slope roofs deserve special care. EPDM, PVC, torch-down, silicone-coated, and other membrane roofs use material-specific flashing details. Applying a random asphalt product or household sealant to these systems can weaken the membrane or void manufacturer requirements. A roofing contractor should inspect those roofs before any product is applied.
Protect the Repair Before the Next Storm
Once flashing has been repaired, keep nearby gutters clear and trim branches that scrape the roof. Check chimney flashing, pipe boots, valleys, and wall transitions at least once a year, especially after severe wind or heavy winter weather. Early repairs are usually simpler and more affordable than waiting for stains, rot, or mold to appear indoors.
If a flashing leak is recurring or the roof area is difficult to access safely, Adore Construction can assess the full roof and chimney connection, explain what is failing, and provide a clear repair recommendation. The right repair should keep water moving where it belongs: off the roof and away from your home.