A chimney leak rarely starts with a dramatic ceiling stain. More often, it begins as a small damp spot in the attic, peeling paint near the fireplace, or a musty smell after heavy rain. This guide to chimney flashing repair explains what protects the roof-to-chimney joint, how to recognize failure early, and why a proper repair is usually more than adding a bead of sealant.
What chimney flashing does
Flashing is the metal system installed where your chimney meets the roof. That joint is one of the most vulnerable areas on a home because rain, snow, wind, and roof runoff all move toward it. Brick and roofing materials expand, contract, and settle differently over time, which can open gaps that water will find.
A properly built flashing system directs water around the chimney and down the roof instead of allowing it behind the shingles or into the masonry. It generally includes base flashing along the chimney, step flashing woven into the roof shingles, and counterflashing installed into the chimney mortar joints to cover and protect the layers beneath.
When those pieces are installed correctly, the system works quietly for years. When they are loose, corroded, poorly integrated with the roof, or covered with failing patch material, water can reach roof decking, insulation, framing, ceilings, and the chimney itself.
Signs your chimney flashing needs repair
Not every chimney leak comes from flashing. A cracked crown, missing cap, damaged mortar joints, failing roof shingles, or a chimney liner issue can create similar symptoms. Still, flashing is a common source of water intrusion, especially on older homes and after severe New Jersey weather.
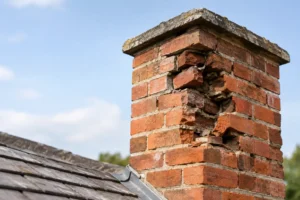
Watch for water stains on ceilings or walls near the chimney, damp attic insulation, bubbling paint, or visible discoloration on the exterior brick. Rusted metal around the chimney, lifted shingles, cracked sealant, and gaps where metal meets masonry are also warning signs.
Inside the firebox, white staining on brick or a persistent damp odor may point to moisture entering the chimney structure. On the roof, loose flashing can sometimes be visible from the ground, but a roof-level inspection is the only reliable way to identify the full problem safely.
A leak that appears only during wind-driven rain is particularly suspicious. Water may be pushed beneath an exposed flashing edge even when normal rainfall does not cause an obvious issue.
A guide to chimney flashing repair: finding the real source
The most effective repair starts with diagnosis, not caulk. A contractor should inspect the roof slope, shingle condition, chimney brickwork, crown, mortar joints, and the full flashing assembly. If water has already entered, the inspection should also consider underlying roof decking and nearby framing.
The condition of the counterflashing matters most. Counterflashing is the upper metal piece that is set into a mortar joint or secured to the chimney. It protects the top edge of the base and step flashing. If it has pulled away from the brick, was face-nailed without proper protection, or has been buried under thick roofing cement, it may no longer shed water as intended.
The roof itself also affects the repair. A few damaged shingles beside an otherwise sound chimney may allow for a focused flashing repair. If the surrounding roofing is brittle, curled, or near the end of its life, replacing flashing without addressing the roof can create extra labor and a short-lived result. The right scope depends on what is actually failing.
What a lasting flashing repair involves
A professional repair often requires removing shingles around the chimney so the flashing can be inspected and rebuilt correctly. Step flashing should be installed in layers with the shingles, not simply placed over the roofing surface. Each piece directs water onto the next piece below it, creating a path away from the chimney.
Counterflashing should be properly secured into the masonry where appropriate, then sealed at the reglet or mortar joint with compatible material. Quality metal matters as well. Aluminum, galvanized steel, copper, and lead-coated copper may be used depending on the roof, budget, local conditions, and desired service life.
Aluminum is common and cost-effective, but it may not be the best choice in every situation. Copper offers excellent durability and appearance, yet it costs more. Galvanized steel can be practical, although corrosion becomes a concern if its protective coating is damaged. A qualified contractor can recommend the material that makes sense for the chimney, roof system, and repair budget.
Proper repairs also address the masonry around the flashing. Crumbling mortar can prevent counterflashing from holding securely. In that case, repointing damaged joints may be necessary before the metal is installed. If the crown is cracked or the brick is absorbing water, those issues should be handled as part of a complete water-management plan.
Why surface sealant is not always enough
Roofing cement and exterior sealants have a place in limited repairs. They can help seal a small joint, reinforce a properly installed flashing edge, or provide a temporary measure before more extensive work. They should not be used as a substitute for missing step flashing, deteriorated counterflashing, or rotten decking.
Heavy patches of black roofing cement around a chimney are often a sign that someone has tried to stop a recurring leak from the surface. The patch may slow water for a season, but it can crack in changing temperatures and hide the condition of the metal underneath. It also makes future repairs more difficult because the contractor must remove the patch material to inspect the assembly.
A repair that costs less today can cost more later if water continues behind the roof covering. That does not mean every chimney needs a complete rebuild. It means the repair should match the cause, with clear explanations of what is being fixed and why.
Can homeowners repair chimney flashing themselves?
Minor maintenance, such as clearing leaves from roof valleys or watching for visible deterioration, can help homeowners protect their property. Chimney flashing repair is different. It involves roof access, fall hazards, sharp metal, masonry work, and an understanding of how roofing layers shed water.
A poorly placed screw, a missing shingle overlap, or a strip of metal installed in the wrong direction can direct water into the roof rather than away from it. There is also a risk of damaging shingles and creating a larger leak while attempting a small repair.
For a temporary emergency, homeowners can place a bucket beneath an active interior leak and document where and when it occurs. Avoid climbing onto a wet or icy roof. Calling an insured chimney and roofing professional is the safer choice, particularly when the chimney is tall, the roof is steep, or water has reached the interior of the home.
What to expect from a professional inspection
A dependable contractor should explain whether the issue is flashing, roofing, masonry, or a combination of problems. You should receive a clear scope of work that identifies the affected area, materials to be used, and whether shingles, mortar, crown repairs, or waterproofing are recommended.
Ask whether the repair includes both base flashing and counterflashing, how the new metal will integrate with the roofing, and whether damaged wood will be checked. If the chimney has ongoing moisture problems, ask whether masonry repairs or a breathable waterproofing treatment should be considered after the flashing is corrected.
At Adore Construction, chimney and roofing work is approached as one connected system. The goal is not to cover a stain or apply a quick patch. It is to protect the roof, chimney, and interior of your home with workmanship that holds up through changing seasons.
Protect the repair with regular maintenance
Chimney flashing should be checked during routine roof and chimney inspections, especially after high winds, ice, or heavy storms. Look for changes in the roofline, loose metal, damaged shingles near the chimney, and new staining indoors. Early attention can prevent moisture from reaching structural materials.
Keep in mind that flashing cannot compensate for a cracked crown, open mortar joints, or a roof that has reached the end of its service life. A well-maintained chimney needs its parts working together: sound masonry, a protective cap and crown, effective flashing, and a roof that sheds water correctly.
If you see signs of a leak, acting before the next major storm is one of the most practical ways to protect your home. A careful inspection and an honest repair recommendation can turn a vulnerable roof-to-chimney joint back into the weather barrier it is meant to be.