A roof leak rarely starts with a dramatic hole in the shingles. More often, it starts at a joint – around a chimney, along a wall, near a vent, or in a valley – where flashing was installed the wrong way, the cheap way, or the rushed way. That is why roof flashing installation mistakes cause so many expensive water problems in homes that otherwise look fine from the ground.
Flashing is supposed to do one simple job: move water away from vulnerable areas before it gets under the roofing system. When it is installed correctly, you may never think about it. When it is not, you can end up with stained ceilings, rotten roof decking, mold in the attic, damaged masonry, and repair bills that grow fast.
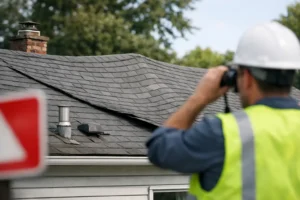
For homeowners, the hard part is that flashing problems are easy to miss until the damage is already inside the house. A roof can look decent from the street and still have failure points around penetrations and transitions. That is especially true after storms, after patchwork repairs, or when different parts of the roof and chimney have aged at different rates.
Why roof flashing installation mistakes matter so much
Shingles, tiles, and membranes shed most of the water on a roof surface. Flashing protects the places where the roof changes direction or meets another material. Those transition points are where water naturally slows down, collects, or tries to work its way inward.
That is why one flashing error can create damage that seems bigger than the mistake itself. A small gap near a chimney or sidewall can allow repeated moisture entry over months. By the time you notice peeling paint or a ceiling stain, the wood below may already be weakened.
In New Jersey, freeze-thaw cycles make this worse. Water that slips into a small opening can expand as temperatures drop, widening gaps and loosening materials. What starts as a minor installation issue can turn into a recurring seasonal leak.
1. Reusing old flashing during a roof repair or replacement
This is one of the most common shortcuts on residential roofs. If the flashing looks “good enough,” some installers leave it in place while replacing the surrounding roofing material. On paper, that saves time and money. In practice, it often creates an early weak point in a newer roof.
Older flashing may already have corrosion, nail fatigue, failed sealant, or slight warping. Even if it is not actively leaking on the day of installation, it may not fit properly with the new roof system. The result is a mismatch between old metal and new materials that tends to fail early.
There are situations where existing flashing can remain, but that depends on its condition, material, design, and how the new roofing system ties into it. It should be a deliberate decision, not a shortcut.
2. Depending on caulk instead of proper metal overlap
Sealant has its place, but it should not be the main waterproofing strategy. Good flashing work relies on layering, overlap, and gravity. Water should be directed out and down, not “stopped” by a bead of caulk.
When an installer uses roofing cement or sealant to compensate for poor fit, missing pieces, or bad alignment, the repair may look fine at first. The problem is that sealants age, crack, shrink, and separate. Sun exposure and weather speed that up.
If your flashing system only works as long as the caulk holds, it was not built correctly. A proper installation should still manage water even as materials expand and contract over time.
3. Incorrect chimney flashing details
Chimneys are one of the biggest trouble spots on any roof because they combine roofing, masonry, and multiple flashing components in one exposed area. A proper system usually includes step flashing along the sides, apron flashing at the front, and saddle or cricket flashing behind the chimney when needed. It also needs counter flashing that is properly integrated into the masonry.
A common mistake is treating chimney flashing like one simple strip of metal around the base. That does not provide the layered protection needed to handle runoff from multiple directions. Another frequent issue is attaching counter flashing incorrectly to mortar joints or relying on surface sealants that do not last.
This is where experience matters. Chimney flashing is not just sheet metal work. It is a water-management detail that has to account for roof pitch, chimney width, brick condition, and long-term movement between materials.
4. Improper step flashing along walls
Where a sloped roof meets a vertical wall, step flashing should be installed piece by piece, with each section woven correctly into the shingle courses. This creates a layered path that carries water down the roof instead of into the wall connection.
One major mistake is using a long continuous piece of flashing instead of individual step pieces. That may seem faster, but it does not perform the same way as the roof moves and drains. Another issue is incorrect shingle overlap, which can expose the flashing edge and let water track behind it.
If siding is installed too tightly over flashing or if the flashing is too short, water can get trapped instead of shedding cleanly. The details matter here more than many homeowners realize.
5. Bad nailing patterns and puncture points
Flashing should be secured in a way that does not create unnecessary water entry points. When nails are placed too low, too exposed, or in the wrong part of the flashing assembly, they can turn into leak points.
This often happens around valleys, vents, and chimney edges, where a rushed installer fastens metal where it is easy rather than where it is safe. Over time, fasteners can loosen, rust, or allow water intrusion around the penetration.
It also matters what is underneath. If the underlayment and flashing are not integrated correctly, even a small fastening error can bypass the protective layers below.
6. Ignoring roof pitch and water flow
Not every flashing detail works on every roof. Low-slope sections, steep pitches, and heavy runoff areas all behave differently. A flashing method that performs acceptably on one section of the home may fail on another.
For example, wider chimneys often need a cricket behind them to split and divert water. Without it, water and debris can pile up on the uphill side, increasing the risk of leakage. In valleys and transitions, metal size and overlap become even more important because those areas handle concentrated water flow.
This is one reason cookie-cutter roof repairs do not hold up well. Good installation is based on how water actually moves across that specific roof.
7. Covering the symptom instead of fixing the flashing system
When a leak shows up inside, some repairs focus only on the visible problem area. A patch of cement gets smeared on exposed metal, or a loose shingle gets replaced, but the underlying flashing design problem stays in place.
That approach can buy a little time, but it rarely solves the issue for long. Water may be entering higher up, behind the wall, or at a counter flashing joint that is not obvious from a quick look. Without identifying the full path of water entry, repeat leaks are common.
This is why roof leak diagnosis matters just as much as the repair itself. The source is not always directly above the stain.
How to spot flashing problems before major damage sets in
You do not need to climb onto the roof to notice early warning signs. Water stains near chimneys or upper walls, peeling paint, musty attic odors, damp insulation, and visible rust on metal components can all point to flashing trouble. Outside, look for loose shingles around roof penetrations, deteriorated sealant, or siding and masonry that show signs of repeated moisture exposure.
It is also smart to pay attention after a major storm or after any recent roofing work. Some flashing mistakes do not show up immediately. They reveal themselves after wind-driven rain, snow melt, or a hard freeze.
When repair is enough and when replacement makes more sense
Not every flashing problem means the entire roof has failed. If the surrounding roofing materials are still in good condition, targeted flashing repair may be the right move. That could include replacing chimney flashing, correcting sidewall details, or rebuilding a failed transition area.
If the roof is older, if multiple leak points are showing up, or if previous patch repairs have already been attempted, replacement may be more cost-effective. The right answer depends on age, material condition, and whether the problem is isolated or systemic.
A dependable contractor should explain that clearly. Homeowners do not need a sales pitch. They need an honest assessment of what failed, why it failed, and what fix will actually last.
At Adore Construction, that kind of practical approach matters because homeowners are not just paying for metal and labor. They are paying for protection – against hidden water damage, repeat leaks, and repairs that should have been done right the first time.
If there is one thing worth remembering, it is this: flashing is not a minor roof detail. It is one of the main reasons a roof stays dry where it is most vulnerable, and small mistakes there rarely stay small for long.