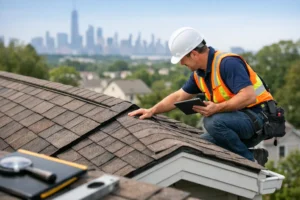
A ceiling stain near a chimney or a damp spot in the attic rarely means the whole roof has failed. More often, water has found an opening at the flashing – the metal system that seals vulnerable transitions around chimneys, vents, skylights, and walls. Knowing how to fix roof flashing starts with identifying whether the problem is a failed seal, loose metal, damaged shingles, or a larger issue hidden below the roof surface.
Flashing repairs can stop a small leak before it damages framing, insulation, drywall, and masonry. But the repair must direct water back onto the roof correctly. Adding a heavy bead of caulk over a problem may slow the leak for a season, but it is not a dependable substitute for properly installed flashing.
What Roof Flashing Does
Roof flashing is typically made from aluminum, galvanized steel, copper, or lead-coated copper. It is installed where roofing materials meet a vertical surface or where an opening penetrates the roof. These areas handle concentrated water runoff and are more likely to leak than an uninterrupted field of shingles.
Around a chimney, flashing usually includes several parts. Step flashing runs up the sides in layers with the shingles. Base flashing protects the lower edge. Counterflashing is set into the chimney mortar joints and overlaps the step flashing, keeping water from getting behind it. A cricket may be built behind a wide chimney to split water and debris around the structure.
A leak near a chimney is not always caused by the visible metal. Cracked mortar, a damaged chimney crown, missing shingles, or worn roofing underlayment can send water into the same area. That is why a careful inspection matters before any repair begins.
Signs Your Flashing Needs Repair
Look inside first, especially after a hard rain or wind-driven storm. Water marks on the ceiling, peeling paint, damp attic insulation, musty odors, or darkened roof framing all deserve attention. Water can travel along rafters before it drips, so the stain below is not always directly under the opening.
From the ground, watch for lifted shingles near a chimney, rust stains, exposed gaps, loose metal edges, or sealant that has split and pulled away. Chimney flashing often fails where the counterflashing meets brick or where the lower apron meets the roof.
Do not climb onto a wet, steep, icy, or visibly worn roof to investigate. A roof leak is frustrating, but a fall can turn a repair into an emergency. If safe access is not available, a qualified roofing professional can inspect the area and trace the source without creating more damage.
How to Fix Roof Flashing: Start With the Right Diagnosis
The correct repair depends on the condition of the flashing and the roof around it. If the metal is intact and firmly secured, but the sealant at an exposed edge has failed, a targeted reseal may be appropriate. If flashing is bent, rusted through, improperly lapped, or loose beneath shingles, it usually needs partial or complete replacement.
Before working, inspect the surrounding shingles. Brittle, curled, cracked, or missing shingles can break during a flashing repair and may indicate the roof is nearing the end of its useful life. On an older roof, replacing only one flashing section can be less cost-effective if a broader roof repair is already needed.
For a small, accessible repair, gather appropriate materials before opening the roof. You may need:
- A flat pry bar and hammer
- Roofing nails or corrosion-resistant screws where appropriate
- Replacement flashing matched to the existing system
- Roofing cement or manufacturer-approved roofing sealant
- A utility knife and heavy-duty gloves
- Replacement shingles if any are damaged during removal
- A stable ladder and fall-protection equipment
Never mix incompatible metals. For example, certain metals can corrode when they contact each other in wet conditions. Matching the existing flashing material is generally the safest choice, particularly on copper roofs or historic homes.
Repairing Failed Sealant at Flashing Edges
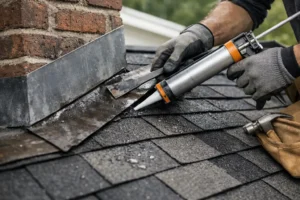
Sealant is often used at exposed nail heads, small termination points, and certain flashing transitions. It should not be doing all the work of keeping water out. If the metal has pulled loose or the overlap is wrong, sealant alone will not solve the problem.
Start by removing loose, cracked, or dried-out sealant with a scraper or utility knife. Clean and dry the area completely. Apply a compatible roofing sealant in a controlled bead where the flashing requires it, then press down any minor lifted edge if the flashing itself is sound. Avoid smearing sealant across large areas or blocking drainage paths.
This type of repair works best when the issue is limited to aged sealant. If water has already gotten behind the flashing, or if the metal moves when pressed, the repair needs to go further.
Replacing Step Flashing Around a Chimney or Wall
Step flashing is installed one piece at a time between each shingle course. Water flows from one piece onto the next and then back onto the shingles. Because of that layered design, it cannot be replaced correctly by simply sliding a strip of metal over the top.
Carefully lift the shingles beside the wall or chimney, taking care not to crack them. Remove the damaged flashing pieces and any fasteners that are no longer holding. Inspect the roof deck for soft, stained, or deteriorated wood. If the decking is damaged, it should be repaired before new flashing is installed.
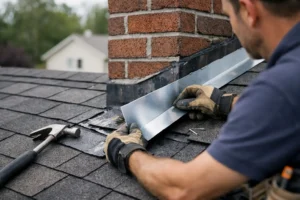
Install new step flashing pieces so each piece overlaps the one below and extends onto the roof and up the vertical surface. The shingle course covers the horizontal portion of each flashing piece. Fasteners should be placed where they will remain protected, not through exposed areas where water can work into the opening.
At a chimney, new step flashing must work with the counterflashing. If the counterflashing is loose, missing, or buried behind failing mortar, the chimney masonry may need repair as part of the job. This is where roofing and chimney expertise should work together rather than treating them as separate problems.
Repairing or Replacing Counterflashing
Counterflashing is the upper metal layer that covers the top edge of base and step flashing on a masonry chimney. It is often set into a mortar joint called a reglet. When mortar cracks or wears away, the counterflashing can loosen and create an opening for water.
A proper counterflashing repair may involve removing damaged mortar, setting new metal into the joint, and repointing the masonry with the correct mortar. Simply fastening metal to the face of brick and covering the top with caulk is usually a short-term patch. New Jersey homes see freeze-thaw cycles that can quickly worsen weak mortar joints and failed seals.
Counterflashing repair requires special care because damaging brick or cutting too deeply into mortar joints can create a more expensive chimney problem. If the chimney is leaning, the bricks are spalling, or the crown is cracked, schedule a professional inspection before replacing the flashing.
Common Flashing Repair Mistakes to Avoid
The most common mistake is relying on tar or caulk as a permanent fix. Roofing cement has a place in targeted repairs, but a thick coating over cracked flashing can hide the problem while water continues entering behind it.
Another mistake is fastening flashing through its exposed lower surface. Every unnecessary nail hole becomes a potential leak point. Flashing must be layered so gravity and runoff do most of the work.
Homeowners also sometimes replace visible metal without checking the roof deck, underlayment, shingles, chimney mortar, or vent boot nearby. If those components are compromised, the leak may return even with new flashing in place.
When to Call a Roofing Professional
Call for help when the leak involves a chimney, skylight, valley, low-slope roof, or multiple damaged shingles. Those areas require careful integration with the existing roofing system. Professional service is also the better choice when the roof is steep, more than one story high, or softened by water damage.
A qualified contractor can identify whether the repair calls for resealing, new step flashing, counterflashing replacement, masonry work, or a larger roof repair. Ask for a clear explanation of the source of the leak and the materials being used. A dependable repair should address both the path water took and the reason it was able to get there.
A flashing problem caught early is usually manageable. If you see staining, loose metal, or cracked chimney mortar, address it before the next major storm gives water a chance to spread through the home. For homeowners who want the repair handled safely and correctly, Adore Construction can inspect the roof and chimney connection, explain the options, and provide a straightforward estimate.